Defender's Quest 2 Progress Report for November 2020
This month we talk all about level design!

Okay so after taking last month off, I am happy to report that I have a non embarrassing progress report for November, despite somehow managing to catch the Flu (but not COVID, thankfully).
TLDR:
Finally finished all of the characters, normal missions, advanced missions, and boss fights for the first two sequences of the game.
The big theme for this month is really "level design". There's a changelog spew at the end of this blog post, but today I'd like to go into a bit of a deep dive on the game's general level design philosophy.
Here's my general goals for advanced missions:
- Too hard to beat when you first encounter them, if you haven't been going back to advanced missions
- Should still be a decent challenge even if you've beaten every previous advanced mission so far
- Should have enticing and interesting rewards
- (Almost) always feature attacker enemies
- MUST require a different defender placement strategy than the normal mission
- SHOULD play with the player's assumptions & knock them out of their comfort zone
Let's look at a few specific examples.
Level 4
Here's level 4, normal version:
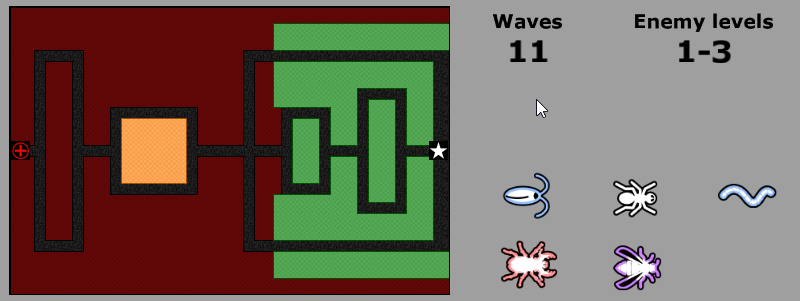
So the normal version of this mission introduces the White Splash class, who is a combination healer / light-AOE damage unit. The blue worm is an extremely fast enemy with barely any hit points; therefore, AOE damage with no upper limit on hits per attack is exactly the ticket.
We put in an extremely obvious choke point and paint it gold to and make it the exact perfect size for the White Splash's range. Pretty obvious, but hey, it's a character intro level, that's the point.
The first half of this level teaches you that the White Splash is really effective for dealing with swarms of fast, weak enemies.
The second half tests whether you know how to use the rest of your party with this new character. The labyrinth on the right has some decent spots where your Long Shot can get great coverage on all three lanes, and then we start throwing some melee (red stag beetles) and strong ranged attackers (purple wasps) at you. This tests whether you've remembered to properly place your Bouncer at the front to take advantage of their ability to soak damage, draw fire, and hold enemies back, while optimally placing your Zerk to hit enemies leaking out the back, while keeping both of them in proper range of the White Splash to take advantage of the new character's healing powers.
Pretty straightforward stuff and fairly easy (hopefully).
Now, here's level 4, advanced:
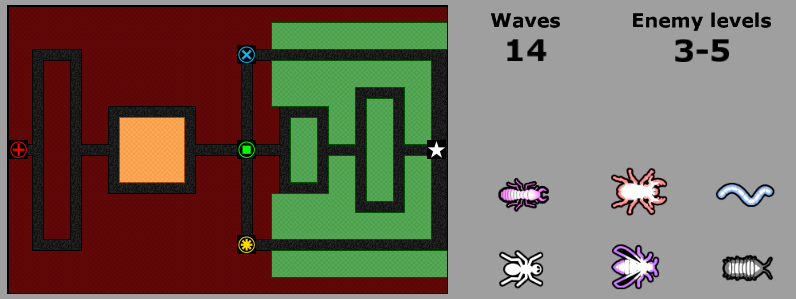
The big thing you took for granted in the first mission was that you had this nice big perfect choke point.
Enemies will start by spawning from the red cross (+) sigil for fully half the battle, but the three sigils right behind the spawn zone should give the player some pause.
Those first waves are filled with attacker types, including the "speedy attacker" (pink termite) which so far I've reserved more or less exclusively for advanced missions. The first half of this mission thus resembles the normal mission, but with much more importance placed on surviving enemy attacks.
As we approach the midpoint I send one tiny wave of normal enemies as a relieving "palate cleanser" with a big long wait at the end, so the player can see the incoming wave of doom about to spawn right behind their ranks.
(One of the big things I've learned over the past few months is that I really need to lean into lane scheduling to build a natural pace and "story" to the battle, so the player isn't just drowning in chaos with no time to grasp what's going on.)
Now the player is forced to abandon their prime choke point and address the back half of the field, with enemies split up amongst lanes. The Juice tax from recalling and re-summoning defenders also helps keep the player's resources just scarce enough to stay interesting.
Level 5
Let's take a look at level 5 real quick:

This battle is the first one after you've acquired your full White Hat party, and tests whether you can use all of your characters together. All the enemies converge on a single obvious choke point, but the lanes are positioned just invoneniently enough to disallowing perfect placement of your Long Shot character. A fairly simple level with some attackers thrown in to make sure you're good at both crowd control and staying alive.
Here's level 5, advanced:
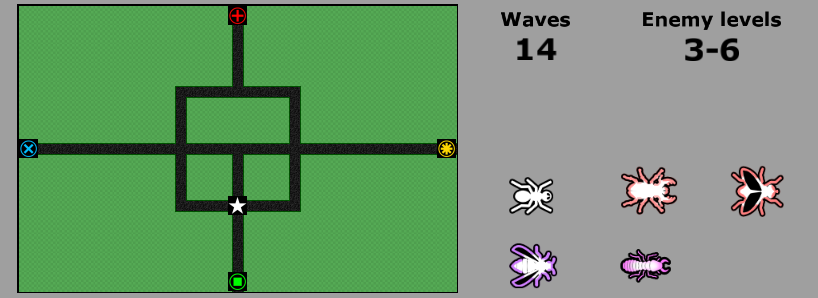
Note that we moved the starting point (the white star). And we didn't move it to the very center, which would have made it very easy to guard. Instead, we now have three long incoming lanes (the blue x, the red +, the yellow *), and one scary short one at the bottom (the green square).
This level tests your ability to deal with threats from multiple directions. Enemies alternate between the three upper lanes until alternating about halfway through, when you get your first little sting from the short bottom lane. Then, you start getting enemies spawning from two lanes simultaneously. Then some tough enemies come in from the left and right, and finally you have an onslaught of fast attackers (pink termites) spawning in from each of the four waves, with a final wave from top and bottom simultaneously.
Rewards
I'd like to briefly talk about rewards while I'm at it. This is an essential part of the game and one that's taken a good while to take shape. Every diferently sized chunk of progress in the game should come with a proportionately interesting and enticing reward. You should have both short term, medium term, and long term goals to look forward to, without getting overwhelmed by too many at any single moment, nor going for too long without enough.
This is the high level reward schedule for the first two sequences:
- Small:
- Money from battles
- Experience from battles
- Medium:
- Save up money to buy new weapon/gear from a store
- Level up & get a skill point
- Big:
- New character
- New cannon ("spell")
After the first two sequences we'll have to mix things up, because you'll have gained all your main party members by then. So instead of gaining new characters, you'll be gaining new minions (which are DQ2's replacement for DQ1-style generic recruits – they'll be new defender classes that are simpler and single-purpose as opposed to the more versatile and multi-purpose named characters).
We'll also introduce item upgrades in sequences 3 and 4. I'd previously tried introducing them earlier and it just didn't feel right because there were so many other systems going on at once, it feels better to introduce that a bit later in the game after you've spent some time collecting a good number of items.
This also brings up the issue of designing good money sinks. Ideally you want to design things so that you have just enough money to buy something you need, but never quite enough to buy everything. We've designed it so that every other advanced mission's reward is a big dose of money, and for this to be meaningful there needs to be an extra tier of expensive aspirational items. I don't feel like I've really sorted out that balance just yet, but I've taken some rough steps in that direction. Definitely something to address in the next push.
Changelog spew for version 0.0.14:
- Add "fast attacker" enemy type (uses Termite placeholder graphic)
- Add "nuke on kill all of these" logic to Hydra Bosses (instead of "nuke on kill this one")
- New items
- Add "heavy blade" item
- Add "heavy blow" effect (more damage but more likely to miss)
- Add "needle blade" item
- Add "needling blow" effect (less damage but two hits at a time)
- Add "blinding ball" for collector
- Add back "frenzy cannon" item
- Lower the radius of the "frenzy cannon" spell
- Add "heavy blade" item
- Set item rewards
- Level 2 advanced perfect: heavy blade
- Level 4 advanced perfect: frenzy cannon
- Level 10 advanced perfect: freeze cannon
- Level 12 advanced perfect: blind ball
- Fix up broken bestiary spotlight entries
- Updated level designs:
- Level 2
- Level 4
- Level 5
- Level 6
- Level 9
- Level 10
- Level 11
- Level 12
- Level 13
- Engine stuff:
- Add delayed hit control so I can trigger bonus hits a few milliseconds after the original so it's effectively simultaneous but you get two different little white number bounces
- Fix bug with item specials (such as spell grants on cannons) not triggering properly
- Minor bug tweaks in e.g. Quick Equip screen
- Implement Hard/Needling hit
- Delete save files from before version 0.0.14