Flow and Feedback -- DQ2 Progress Report for July 2021
This month's progress report is all about feedback, in both senses of the word: 1. Communications we've gotten from our community and playtesters, and 2. the way the game itself communicates pertinent info back to the player.

Howdy Defender's Quest fans!
This month's progress report is all about feedback, in both senses of the word:
- communications we've gotten from our community and playtesters, and
- the way the game itself communicates pertinent info back to the player.
Last month we detailed the findings from a series of playtests we ran through and some of the problems we encountered. This month I made a stab at fixing some of them. In following the Steve Krug method, the trick is to solve obvious UX problems in the simplest and most direct possible way, lest by overthinking you just create new UX problems that in turn need other fixes.
Here's all the stuff we fixed, how we fixed them, and why we think they were the right fixes.
The Right Info at the Right Time
DQ2 is a game with a lot going on under the hood, and one of our commitments is never to hide crucial information from the player entirely. However, showing too much information at once is intimidating and confusing. Ideally we should show the player exactly the information they need exactly when they need it.
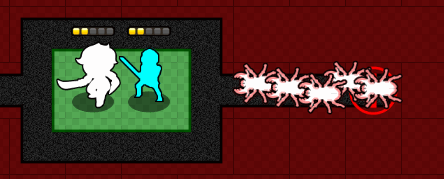
In the previous build, when you would encounter a new level you would see something like this:
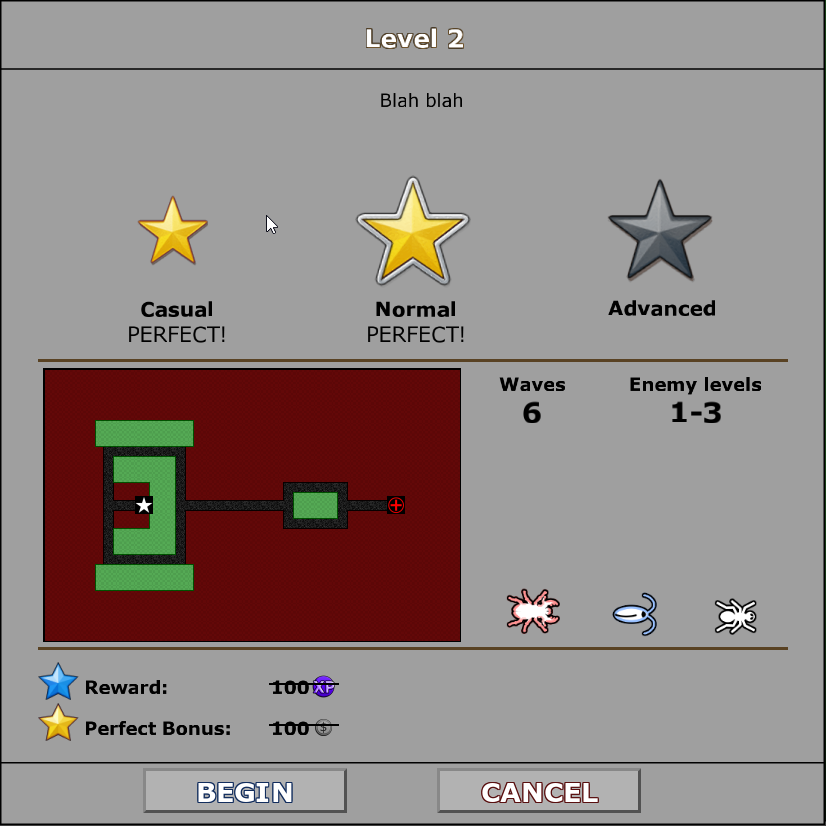
In this context, the player has never seen the red stag-beetle-type enemy or the blue cockroach-type before, and some players were expressing some anxiety and nervousness. "Here is a new enemy, but I don't yet know what I'm supposed to do about it because I haven't seen them in action yet."
My first naïve reaction was, "Oh no! I better not introduce more than one enemy type per battle," but then I thought deeper. Let's go back to first principles.
What is the purpose of this menu? It's to let the player know what they're about to fight, so they can start mentally preparing. When you're deep into the game seeing all the enemy types ahead of time (and being able to mouse-over them for stats) this is a big help. But when you encounter a new enemy type, especially this early in the game, this isn't as helpful.
Having not yet seen the enemies in action, nor yet gotten much of a handle for the game's systems, all the player needs to know is that they're up against new threats. The best course of action is probably to just signal "you're about to encounter some new stuff" and assure the player that the game will give them the tools they need to deal with the upcoming challenge. At least, that's all the player needs to know now – when they're facing off against the enemies in battle in a few moments, they'll want to know more specifics.
So I tried a simple approach: just obscure the identity of any enemy you haven't encountered yet.
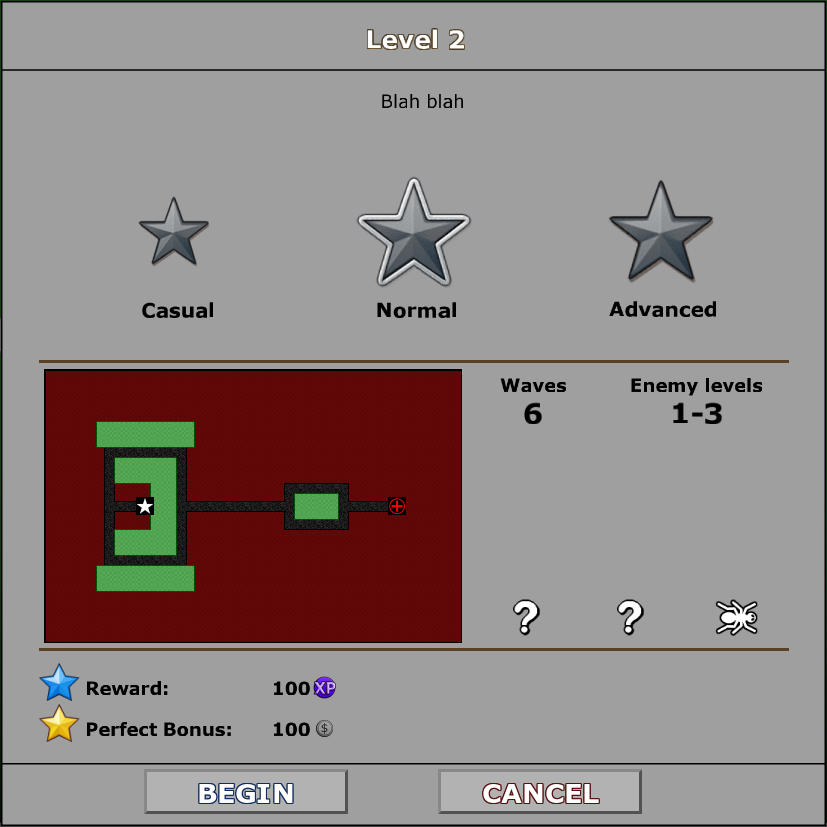
You can still mouse-over them to get tooltips for their stats and whatnot, but this communicates the following to the player:
- Hey, two new enemy types are about to show up
- You don't really need to know what they are yet, just start the battle already
Once the battle starts, the tutorial unfolds. This level is the introductory showcase for the "Bouncer" unit, whose entire purpose is to protect other defenders and deal with crowd control. So naturally we're going to want to introduce an aggressive melee-type enemy right here.
As the tutorial unfolds the player first learns to place the Bouncer on the front lines, after which a wave of attacker enemies spawn for the first time:
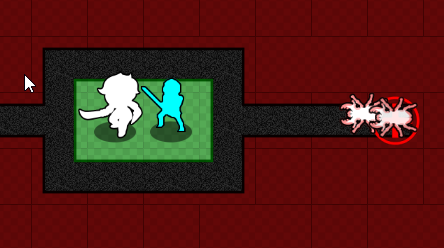
This is followed by a dramatic "spotlight intro" reveal for this enemy type. In this build, this is the first time the player has ever seen this enemy type. It makes it crystal clear what this enemy does and makes perfect sense in light of this stage and the action the player has just taken. Testers who played this version immediately understood the Bouncer's true purpose, whereas in previous builds it was much less clear.

And now that you've encountered this enemy type, it will always be revealed in future map previews:
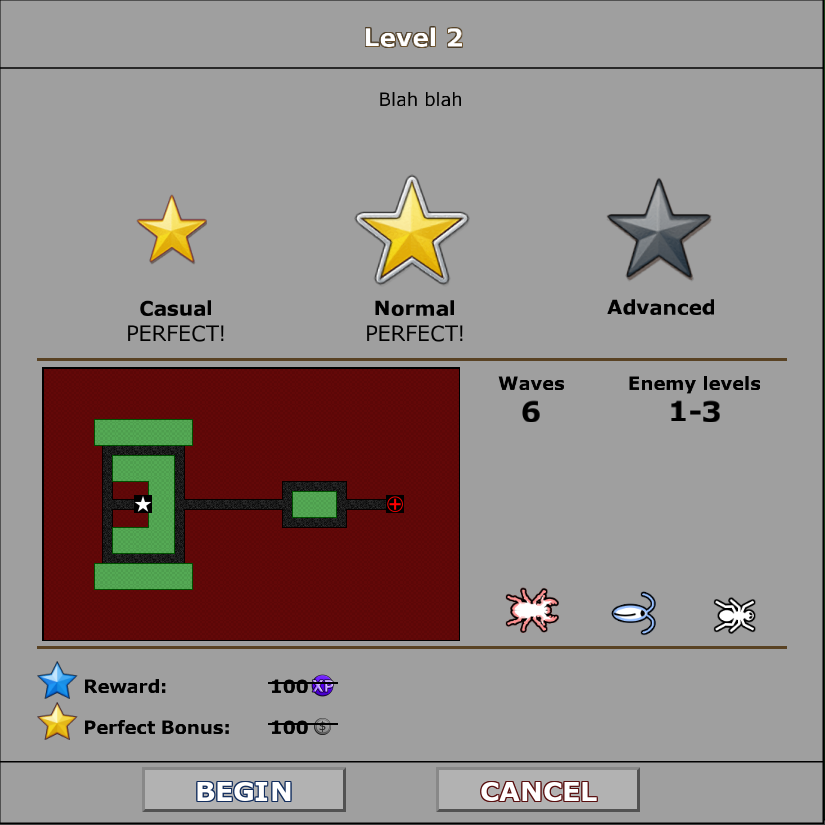
Once we'd done this feature, I found that it also allowed me to remove the special-case code dating back to DQ1 to always show bosses as a "?" icon to avoid spoiling them. Now, after you've beaten a boss fight, the boss' icon will be revealed but there will still be an air of mystery the first time you encounter them, just like for any normal enemy.
Order of Introductions
Another major change we made in this build was to introduce the Bouncer character second, immediately after the Zerk, the other principal melee unit for the White Hats, but before the Long Shot, the principal ranged unit. By putting Zerk and Bouncer's introductory stages right next to each other it was easier for us to design levels that highlighted their differences. We need to avoid players cheesing through introductory levels without learning crucial concepts lest they get stuck later on and find the game inexplicably difficult and frustrating.
This was happening in previous builds, and our suspicions fell on introducing Long Shot before the Bouncer. The specifics of the characters worked out such that if you had Long Shot in your party, you could cheese through without fully understanding what you were supposed to do with Bouncer. We initially responded by just adding more and more aggressive melee units to Bouncer's intro stage to drive home the point "USE THIS GUY TO PROTECT EVERYONE ELSE," but with Long Shot in the mix players just weren't getting the message – they were just as likely to try to pick off the aggressive enemies with Long Shot as they were to experiment with Bouncer, even with super obvious tutorials calling out what to do.
And that's the thing about tutorials – you can be as explicit as you want, but at best they're reinforcement and clarification, if they don't line up with what the circumstances are naturally encouraging the player to do, they're not going to save you. (They're still important, though).
This made us sit down and look at the problem from a more zoomed out way.
Each class has a central purpose, and each class has a "showcase threat" they are meant to counter, demonstrated in their intro stage. However, some classes have "confusion potential" if they're introduced in the wrong order.
Here's a quick table:
| Class | Purpose | Showcase Threat | Confusion Potential |
|---|---|---|---|
| Zerk | Best Damage | Basic enemy | |
| Bouncer | Tank + Crowd Control | Attacker enemies | Maximizing damage |
| Long Shot | Long-range, high damage | Spread out enemies over multiple lanes | Dealing with attackers |
| White Splash | Support, Healing, Area damage | Weak-but-fast swarms | Dealing with attackers, multi-lane damage |
The Zerk is there to do the most damage. They are not an obvious counter to anything in particular and are good in any situation where enemies are in melee range. They are the most straightforward and have the least confusion potential, so it makes sense for them to go first.
The Bouncer is there to hold back a swarm of attackers, while also drawing their ire and absorbing damage from them. Crucially, they do less damage than the Zerk, so you want to save them for protection rather than just deploying them to kill things. So it makes sense to introduce them second so you can use them to protect the Zerk, while also seeing the Zerk do more damage.
The Long Shot is there to do lots of damage at long range (but less DPS overall than the Zerk). The Long Shot gives you excellent map coverage, and to make ideal positioning to get as much of the path in their double-damage-at-long-range zone. Because they can target so many enemies and do relatively high damage, it's easy to think this might be one of the main things you should do about attacker enemies – light them up with a unit that can pick them off from afar without being in danger of retaliation. And this is certainly something you should do, it's just not the primary and only way you ought to deal with melee threats when you also have the Bouncer at your disposal. For this reason the Long Shot should come third or fourth.
The White Splash is a general purpose support unit that does a few different things. For one, they are the White Hats' only healer. Second, they do a low amount of damage over a medium-range area, hitting all targets in range. Third, they inspire nearby units, giving them a small damage boost. They are therefore an excellent unit to place next to a "kill team" of other units – inspiring them to up their damage, and healing them from any attackers. What the White Splash is absolutely indispensable for, however, is dealing with tightly packed swarms of fast but low HP enemies, or any other scenario where the total amount of damage you do is less important than the number of targets you can hit at once.
Given that this unit's support role depends on other units to give it meaning, it's obvious that it should appear no earlier than third in the introduction list. Two things push me over the edge to making this unit go fourth – it's the least straightforward, for one, and the rule of firsts says that by introducing the Long Shot before the White Splash, players will believe that the Long Shot is the main way cover multiple lanes with one character, which is exactly what we want.
Reinforcing Feedback
The latest playtests of version 0.0.21 have shown that players are much less confused than they were in previous builds. For instance, just a few tutorial bumps to reinforce the idea that boosting is a permanent bonus to a defender on the field seems to have solved the confusion from last month (thanks to everyone who wrote in suggesting alternate wording like "upgrade" and "strengthen", but I think we're good for now unless more trouble comes up in future playtests).
But there's still a few rusty spots. For instance, many players still aren't understanding that the White Splash has an "inspire" status effect that boosts the damage of their nearby friends, which keeps them from using the White Splash if they don't anticipating needing to heal. The inspire bonus is supposed to be a primary usage of the White Splash, so I need to fix this.
But how? It's not enough to contrive intro levels that punish you for "not getting it" – I also have to make what's happening obvious. I'll noodle on how to make that work for White Splash, but I can report on one success we've had already.
A common problem with earlier builds was that players weren't always understanding how to use their units together. The most basic thing players try to do in Tower Defense is "cover the map," but there's situations where sticking units next to each other lets them play off each other's strengths, and this is one of the key lessons we try to drill home in the entire white hat sequence – when to place units together, and when to place them apart.
Again, you could be more explicit in tutorials, but that's always a blunt instrument. My hypothesis was that most players weren't even aware that "place together" and "place apart" were a fundamental choice they were even making. So I made some tweaks to the Zerk's skill tree, replacing the "bonus damage against FAST enemies" and "bonus damage against ATTACKER enemies" with a pair of skills called "Lone Wolf" and "Pack Leader":

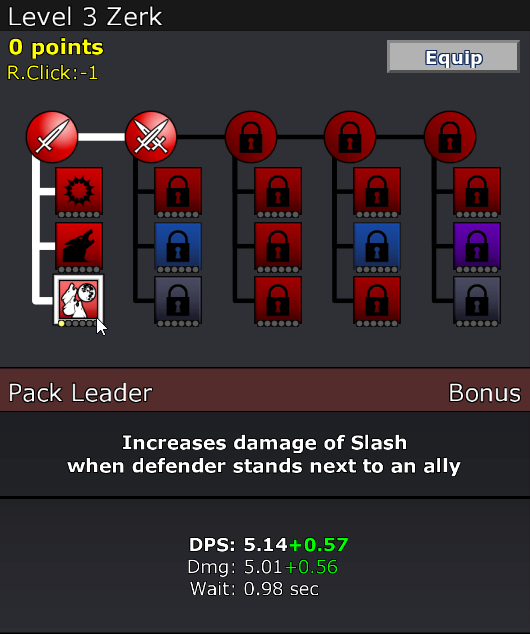
This tweak makes it so that when players encounter their first skill bonuses to put points into, they notice that "placing a defender next to other defenders" is a choice at all. This helps to reinforce all the other design decisions I'm making with the Bouncer, White Splash, etc.
But we also noticed from testing that players often felt that "nothing was happening" based on their skill choices. Sure, the numbers were going up, but the game world wasn't really acknowledging that the player had done something. So we added some in-battle notifications to make these signals clear:
Many players would wonder aloud at exactly how a skill would play out, and testing revealed that these notifications helped cement their understandings. "It says 'When defender stands alone' – does that mean if nobody's next to them? Do diagonals count? Oh, here we go it says '+Lone Wolf', yep, it's only cardinal directions. Great, that makes sense."
I'm mostly encouraging players to stick melee units together, so it might seem strange to have a skill like "Lone Wolf" that encourages the exact opposite of that. Our tests have shown that by making it more obvious what kind of choices there even are, players are more likely to try out all of them, whereas otherwise they just flail around. The existence of "Pack Wolf" becomes an obvious choice for when the "packed kill box" strategy becomes clear. That said, "Lone Wolf" is certainly a valid strategy once you start to unlock more skills and design your builds around it. It's all about stimulating the player to think about what tools are at their disposal and how they relate to one another. Once that's clear the problem solving typically takes care of itself.
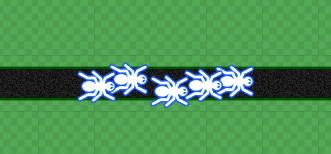
We used a similar notification technique to highlight other effects that aren't always obvious. For instance, as of a few builds ago, frozen enemies become "wet" when they thaw out, making them more vulnerable to electrical attacks:
So that's nice and obvious now.
But the most important usage of this new notification system was to make feedback much more clear and organic in the Bouncer's introductory stage. The entire lesson we're trying to teach you here is that you should put your tough defensive Bouncer first to protect your vulnerable but high-damage-dealing Zerk. Previously we'd tried to emphasize this by throwing an onslaught of attackers at you that made the battle effectively impossible to beat without the proper strategy.
But even with a tutorial you need feedback from the game to tell you what you're specifically doing wrong. This all clicked when we finally realized that many players weren't noticing that defenders were even being injured until they were already dead.
Now we make it more clear when a defender is taking damage and how much you need to worry about it. Compare the two following scenarios, one where the Zerk is on the front lines, and one where the Bouncer meets the attackers head on.
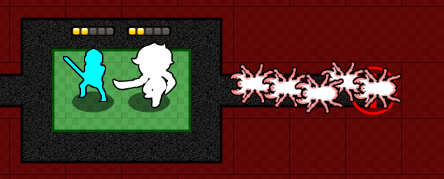
We have varying degrees of "OUCH" feedback, depending on how quickly a defender is likely to die from the amount of damage they're taking:
| Condition | Feedback |
|---|---|
| Damage/second is below regeneration rate | Small grey "meh" |
| Damage/second is above regeneration rate | Small red "ouch" |
| Damage/second will quickly kill defender if sustained | Big red "OUCH" |
| Defender is < 50% health and taking damage | Big radial lines extending from defender |
By layering additional bits of feedback like this as necessary we can continue to deliver exactly the information the player needs to know exactly when and where they need to know it.
Quenching Fears and Anxiety
One of the major obstacles to getting players to experiment with the game and understand how it works is all the existing baggage they have from previous games, primarily the fear and anxiety that certain choices will be irrevocable.
In DQ2 you can rearrange all your skill points at will, so you're free to play around with skills as much as you like, and it's not a big deal to make a perfect choice the first time. But players don't always know that. Most games have taught players that whatever skill point investment they make will be irrevocable and permanent, which makes the choice much more high stakes. They don't fully grasp what all the skills will do yet because they haven't had an opportunity to try them all out in battle, and now they feel they have to read each skill in detail rather than just make a choice and see how it goes. They tend to freeze up when they have to make this choice.
This was solved by simply adding a line to the tutorial where you first get skill points:
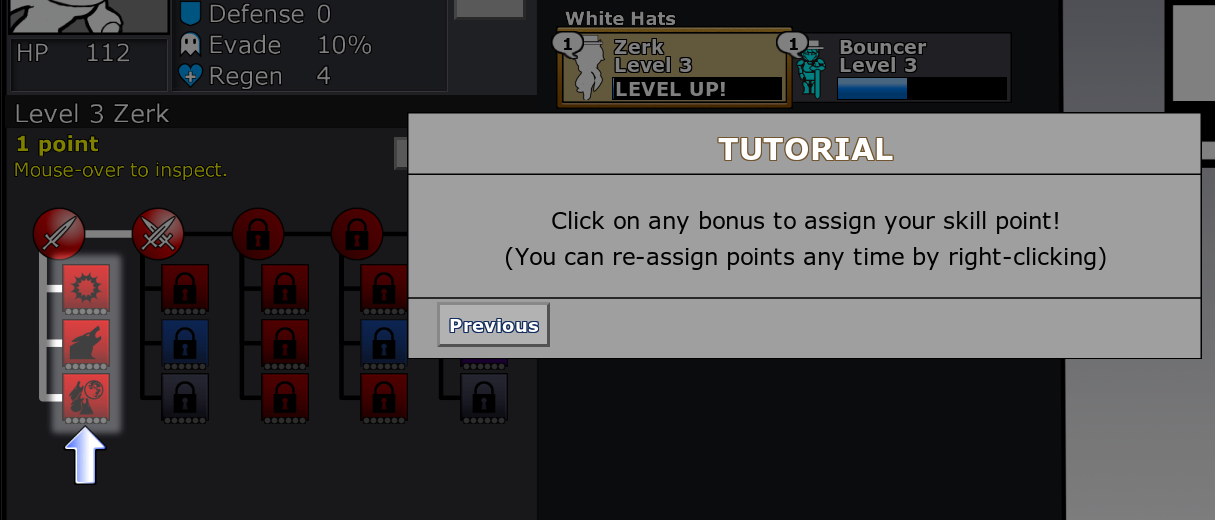
Previously we had the same "you can re-assign points" line but it would only appear after you had allocated your skill point. After seeing players agonize over their first choice (or even deciding not to invest in skill points at all and just save them up for "later"), we thought this was the best approach. Seems to work so far.
Item & Shopping Flow
One of the last systems I've been trying to fix this last month has been the town/shop flow. In previous builds I've found that we simply introduced too many items too quickly. This was another benefit of moving the Bouncer earlier in the introduction list – since the Bouncer shares the same weapon type as the Zerk, I can delay introducing a new item type by another whole beat, making the first shop screen much simpler.
Tweaking item drops so far has mostly come down to getting a good sense for how much money the player has to spend and making sure they have the ability to buy something, anything, with what they have on hand, as well as to present a few aspirational purchases just out of reach. In early builds shops were spaced too far apart, and players would get overwhelmed with new choices all at once. The new shopping flow has me introducing new shops almost every other battle. I was initially afraid this would be too frequent, but instead it seems to play out very nicely. Players seem to like having more shops that each introduce fewer new things more frequently. This makes it much easier to introduce entirely new categories of items like gear and cannons without overwhelming the player or risking them missing them entirely.
And that's about it for this past month! We still have more to do to accentuate feedback and fix all the problems players have revealed through testing, but the game is starting to feel a lot better after just a few small tweaks and that's getting me really excited.