Overcoming "Level Designer's" Block -- DQ2 Progress Report for August 2021
Our north star is making sure that each character's identity is established as solidly and clearly as possible before moving on. The player should instantly be able to grasp, "this is what this character is for."

Howdy Defender's Quest Fans!
Today we're going to go over everything I've done in the last month and also take a bit of a deep dive into my approach for overcoming "level designer's block."
Our north star is making sure that each character's identity is established as solidly and clearly as possible before moving on. The player should instantly be able to grasp, "this is what this character is for."
Cleanup to the White Hat phase
First up is the "Bouncer" character. We already made some large changes last month by introducing them earlier in the game and adjusting level design and visual feedback, but there was still a bit more to do.
What is the purpose of the Bouncer? Crowd control. This unit holds back a huge tide of enemies, buying enough time for the rest of the team to deal with it. To do this job effectively, Bouncer needs to be able to survive the onslaught, and even draw attention to themselves to protect others, making them a "tank" as well.
A couple changes naturally fall out of this.
One, we made it so the Bouncer's "taunt" ability now draw attacks from ranged enemies, not just melee enemies. Before, ranged units were able to walk right up to the Bouncer and then shoot at defenders standing behind them. After the change, the Bouncer diverts the attention of all nearby enemies to themselves, melee or not. Clearer "on or off" relationships like this are easier for the player to understand and strategize around.
Two, we reduced the Bouncer's damage. Tests showed that the Bouncer was often doing more damage than the Zerk, which steals the show from the prime damage dealer – it was getting to the point that you could hold an entire lane with the Bouncer with the Zerk barely even getting a whack in. Bouncer's purpose is to hold back the tide more than just wiping everything out themselves. This gives the player more incentive to actually use their defenders together as a team, which is one of the main lessons of the game.
Next, we had some fixes for Long Shot.
The original Long Shot level was a bit confusing for some of our playtesters:
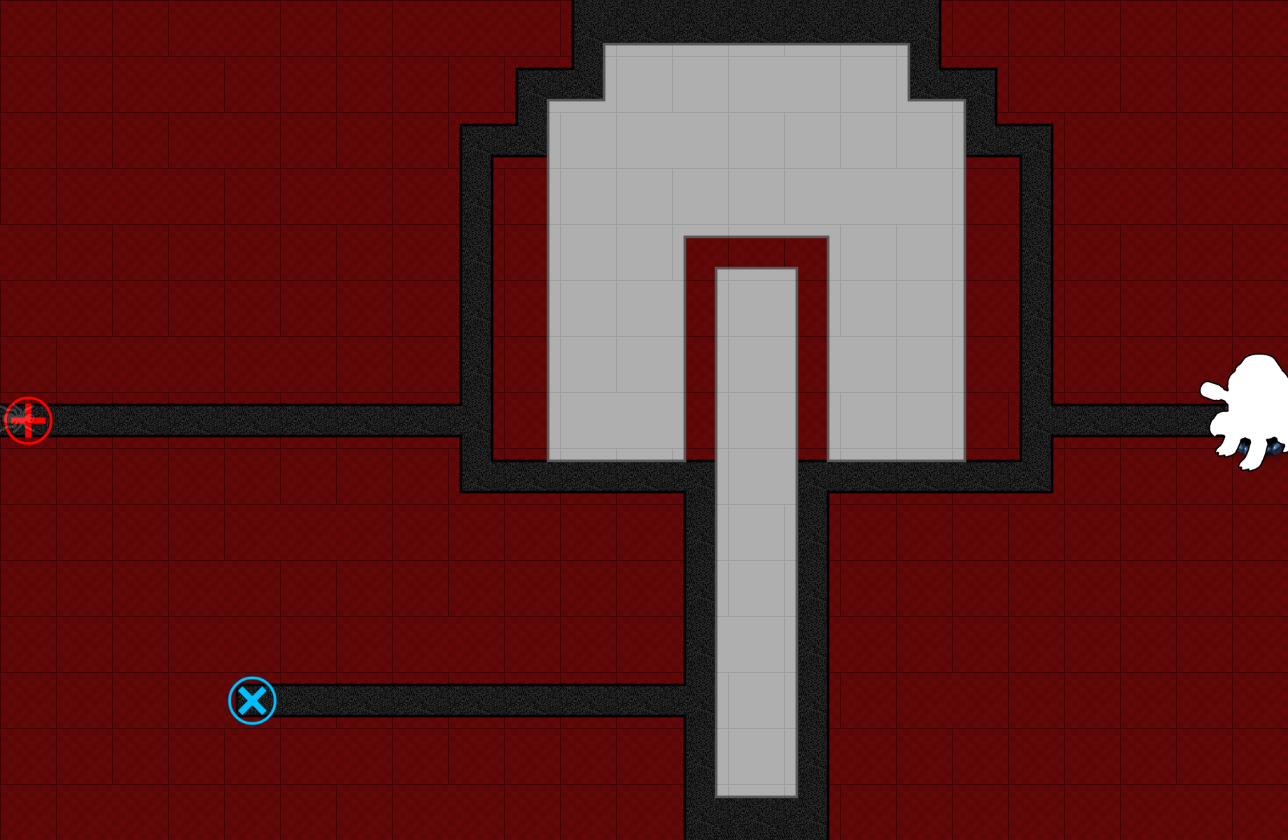
We learned that the split path from the red spawn zone was confusing when introduced this early – players were uncertain about which way the enemies would go, which was unnecessary anxiety on top of also introducing a new character. I had carefully counted out the path distances to make sure enemies would split evenly (they always favor the shortest path and split up if there's a tie), but the asymmetric shape didn't make that clear to players.
Also, although it was usually clear where to place Long Shot (towards the top of the large vertical strip at the center of the "mushroom" cap), the level didn't give you much understanding of how to best use your melee units. Ideally we wanted to build on the skills the player learned in the last mission, ie, to use the two melee units together as a team, with Bouncer out front holding back foes and protecting Zerk who deals the majority of the damage.
We cleaned up the level a bit, shrinking the top landmass so you can no longer place melee units along it, and removing the split paths. This solves both problems. Long shot is now the natural (and only) choice to cover the top lane all by themselves, which then make it natural to place your melee units on the patch of land below it:
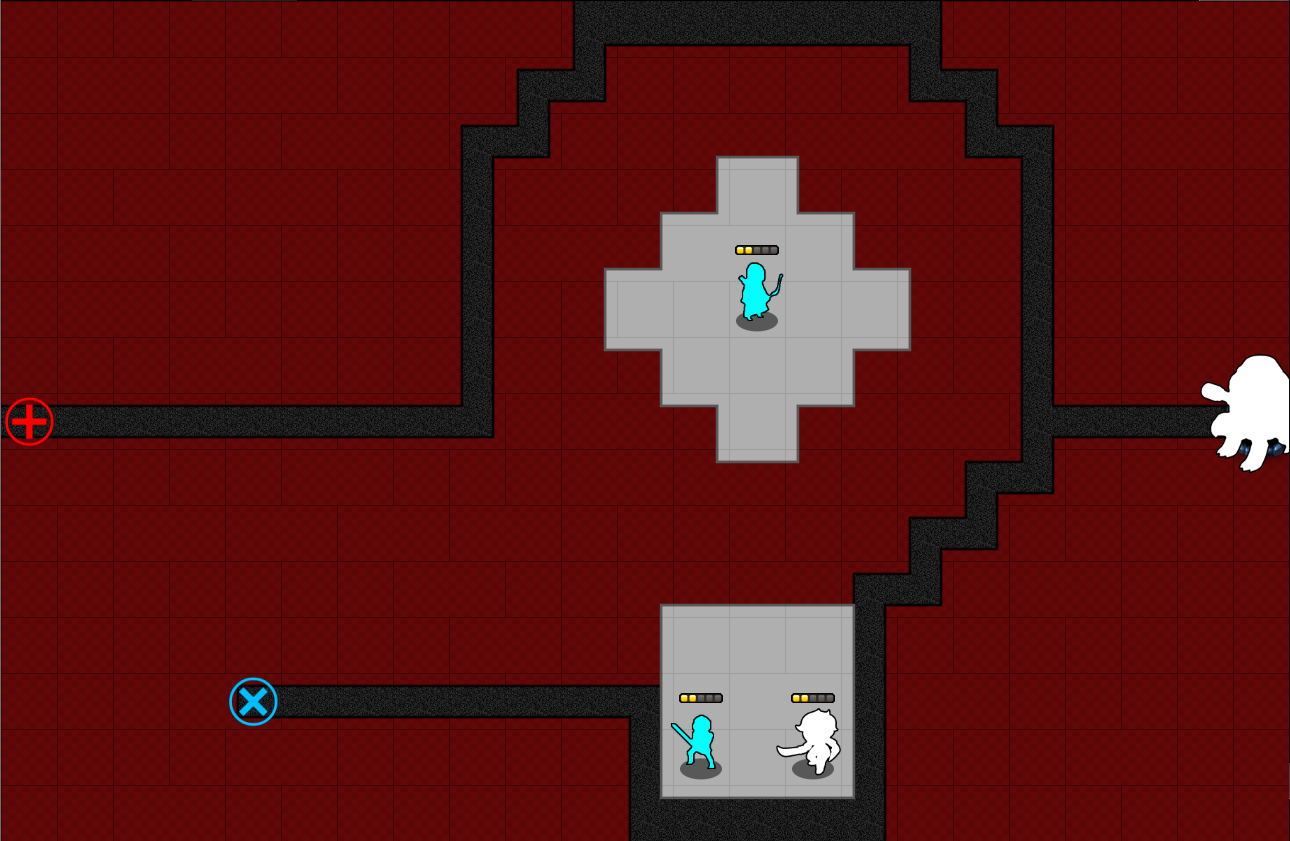
This makes choices fairly limited, but that's exactly what you want in a character introduction mission. Early tests seems to indicate it's working.
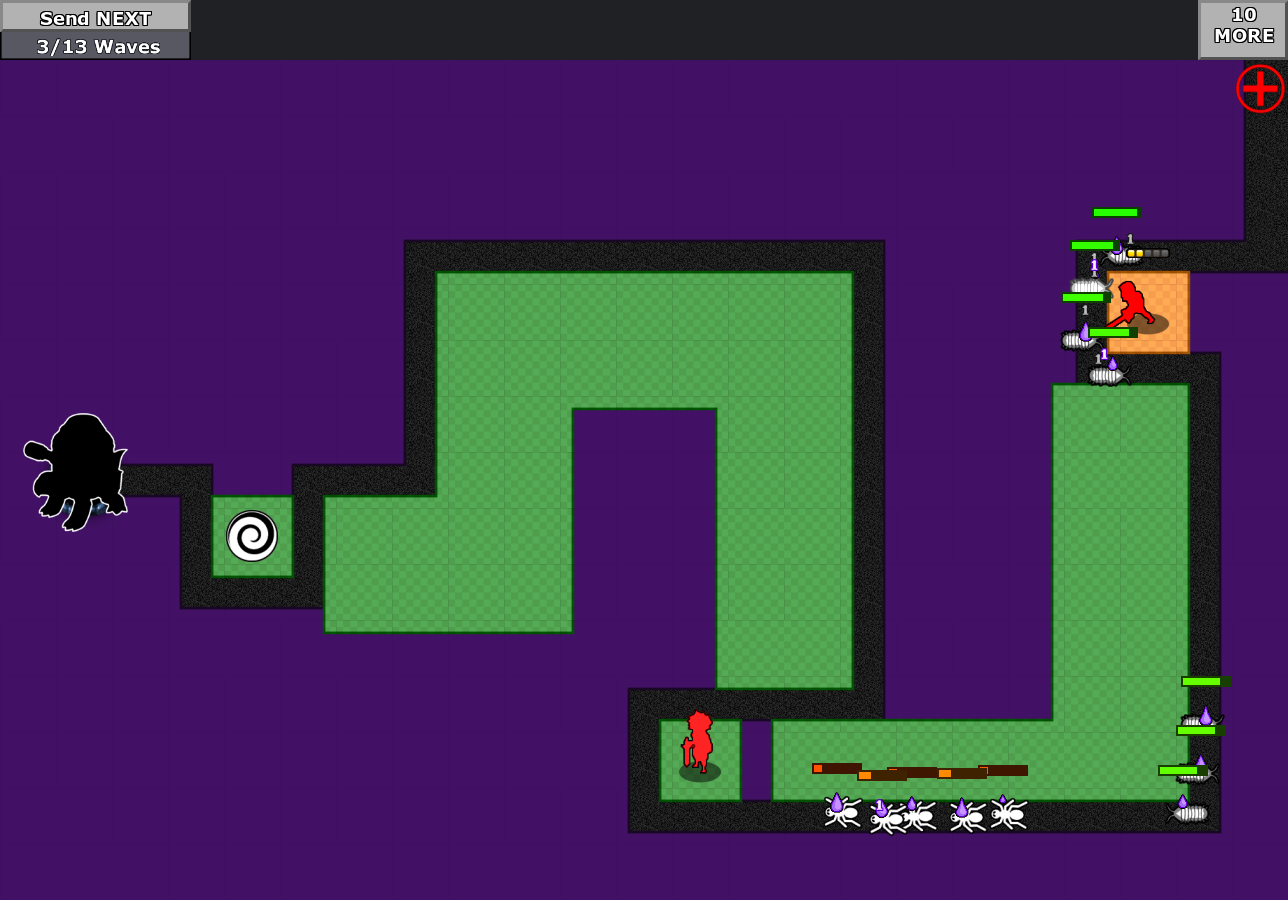
The next level remains mostly the same as last month, but with some tweaks to the waves and timing to make it flow better. At the end in particular we throw a lot of aggressive enemies towards the player to make sure that they're using the just-introduced White Splash's healing powers properly:
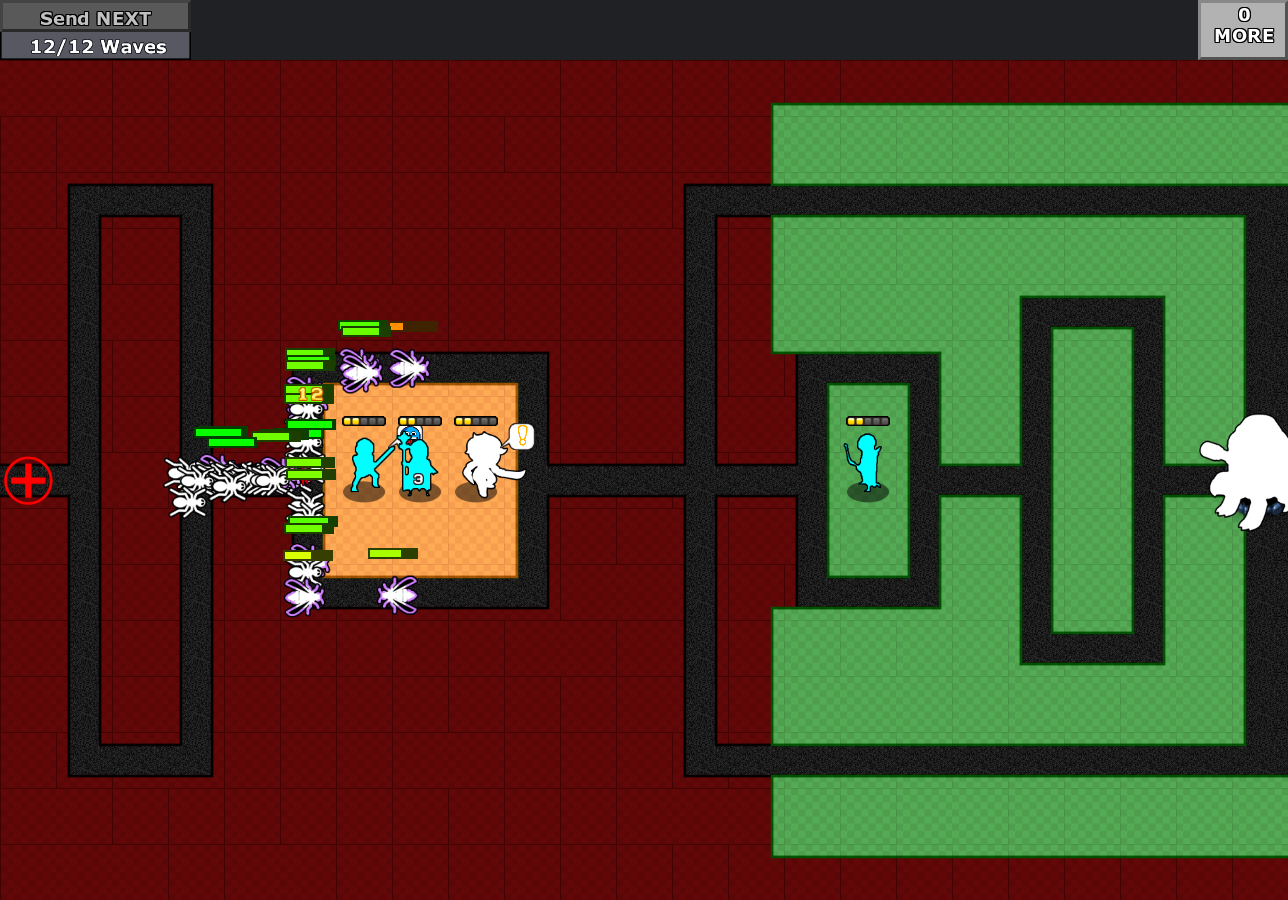
This battle's end phase used to have some problems because the final wave of long-ranged enemies (the purple wasp placeholder) would usually obliterate the White Splash no matter what and completely ignore the Bouncer in front. This invalidated the whole thing we were trying to teach: "put your Bouncer up front! Put your Zerk next to or behind them! Heal and inspire both of them with the White Splash, who should stay off the front lines!" Fixing the Bouncer's taunt to draw fire is the necessary solution.
Playing through it just now, it looks like the White Splash is still taking a few hits from ranged enemies, but they're not getting mobbed and killed like they used to, so it looks like that bug is only partially fixed. Something to fix for next month.
Crafting the Black Hats' Identities
The Black Hats needed a lot more than just cleanup work and this is where the majority of the past month's work has been.
The main trouble was figuring out the purpose and identity of the Black Hats' first two units, Jumper and Eliminator, both melee fighters. The Jumper's identity was fairly solid – a character who can teleport to a user-defined jump zone any time for free. Play-testers have been understanding this right away and find it really fun.
The Eliminator on the other hand has always been a bit of a muddle because they have two purposes in direct conflict with one another. If you place the Eliminator close to the ship they get an attack bonus, but if you place them close to an enemy spawn point and far away from the ship you get the most use out of their long-lasting poison abilities. This makes it very confusing what this character is "for", and also makes designing a proper introductory level nearly impossible.
A good introductory level must do a few simple things quickly and effectively:
- Introduce a new character
- Showcase an obvious and intuitive way to use them
- Require you to use the character correctly to win the battle
- Make the battle very difficult to "cheese" through without understanding
Testing has shown over and over again that when a character's identity isn't clear, players will misunderstand their purpose for the entire rest of the game. Levels quickly become harder than they should be until they're nearly impossible, and players' enjoyment plummets. Worse, because players have been actively misled by the designer about how the character works, players grasp at straws and try random things, and only very occasionally will it "click" how they're actually supposed to use the misunderstood character.
It's a bad pit to let players fall into, and it's entirely the fault of the designer (i.e., me) for not explaining the character properly in their intro level. As for why an intro level can fail, it's usually down to problems with the level design, the character design, or both.
So here's how we fixed our flawed intro levels for the Black Hats this month.
Emphasizing Jumper's Vulnerability
The first Black Hat level, the Jumper's, hasn't changed. This one works pretty well. Jumping is complicated enough by itself that it needs to be isolated in the simplest way possible:
The "gameplay story" the level tells is pretty simple: "Here's the Jumper, please place them, then place the jump zone. Here's how jumping works, here's some enemies, now jump back and forth between paths to beat this level. You have a fire bomb cannon if you have a leak."
Virtually everyone gets this level on the very first try, and from then on they have a powerful and sophisticated new tool in their belt – jumping the Jumper around at will.
The problem is there's another aspect to the Jumper we need to establish too, the fact that this character is a glass cannon – a really strong but vulnerable unit that can dish it out, but can't take it. It becomes harder to get this across once we add other characters to the mix, so we need to do it early. But trying to cram that second lesson into the first level is too much, so we need another pacing level to get it across.
Here we teach the player that jumping away can be a way to protect the Jumper from danger.
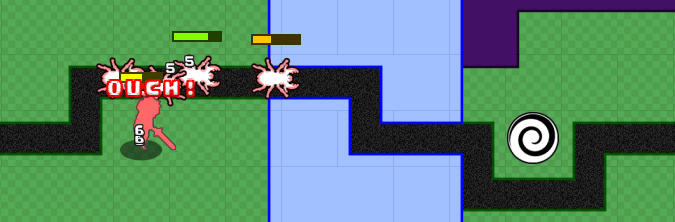
At first I had trouble orchestrating this naturally, because I thought I had to set it up so that Jumper would take a lot of hits and be in immediate danger of death if you didn't jump him away to recover health through regeneration. Turns out all that's really necessary is to set him up to take any damage at all and give the player another reason to jump across the river.
This is easily accomplished by just spawning the enemies at a sufficient rate that Jumper can't kill them all on the first pass.
The player naturally observes that jumping away gets Jumper out of danger, that he naturally recovers enough health by the time the enemy has reached his second location. Even better this introduces another tactic – using jump zones to double the amount of damage Jumper is able to deal to the same group of enemies by getting two bites at the apple.
With those lessons learned, Jumper's identity feels clear. The next thing to tackle is Jumper's initial column of skill bonuses.
Last month we changed Zerk's boost-1 bonuses to "Pack Leader" and "Lone Wolf" which confer damage bonuses for standing alone and standing next to another defender, respectively. Balance aside, the main purpose of these was to subtly nudge the player into thinking "placing defenders by themselves or next to each other is an important choice."
With Jumper the message I want to send is "managing Jumper's health is important." So what I'm playing with this month is a set of bonuses that trigger when he's damaged, and when he's at full health:
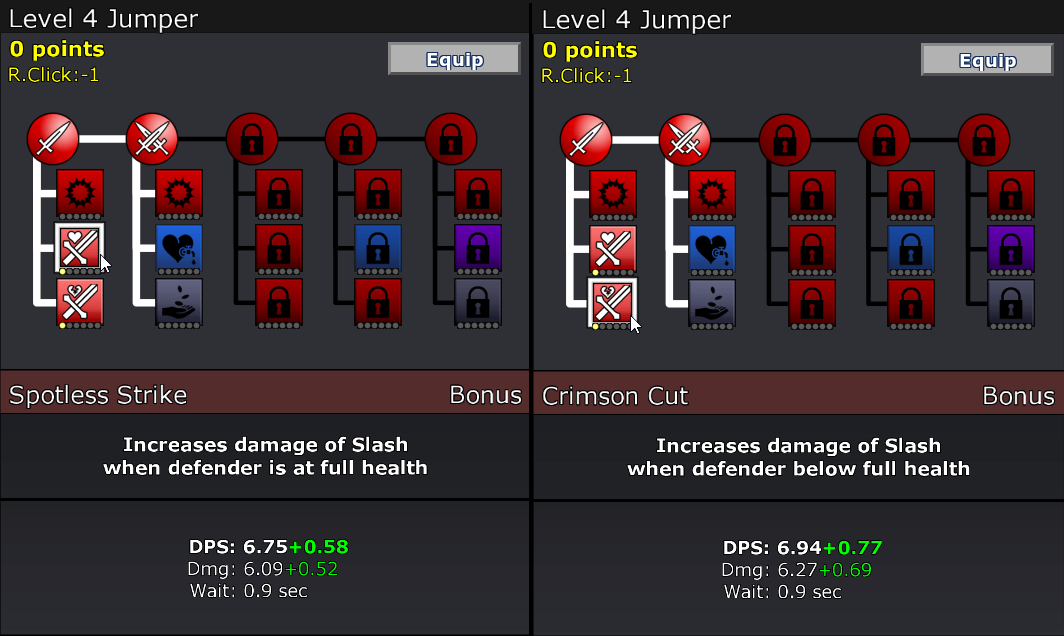
"Spotless Strike" increases damage when Jumper is at full health, and "Crimson Cut" increases damage when he's damaged. I haven't decided yet whether to make the damage bonus for these the same or to give a slight edge to Crimson Cut as that one feels a bit riskier and harder to use. Going with the latter for now.
Again, it's okay if this isn't possible to balance perfectly and one will always be "better" than the other, because the real point here is just to get the player paying attention to Jumper's health levels. There's also visual feedback that kicks in whenever either condition activates, we'll see if testers find this useful or annoying:
Recasting Eliminator as Assassin
Next up is Eliminator, who we redesigned and renamed "Assassin." It became clear to me in this last month that even I wasn't sure exactly how I was supposed to use Eliminator in battle. Having a character with two very different purposes sounds kind of versatile and interesting on paper, but it's just been a mess in practice.
Now that I've formalized my best practices for intro levels the problem is clear – if there's two fundamentally opposed ways to use a character, then the intro level can at best showcase one of them. No matter what the player does, they will miss out on half of the character's use cases. That's a recipe for confusion.
So what is the Assassin's identity? Eliminator's purpose was supposed to be "either a goal-tender to finish off stragglers, or a front-line guy who applies de-buffs and damage over time." The simplest solution is to just pick one. So we picked the latter. We're not done redesigning the character yet, but Assassin is now a unit you're encouraged to put as far forward on the enemy lane as possible so their poison will have lots of walk time to deal damage, softening up enemies for your mid-lane defenders and end-lane goaltenders.
And you know who's good at those other two roles? Jumper. Jumper in many ways is the ideal goaltender, because you can stick him on the end "just in case" and then also somewhere on the front lines. This not only gives you a way to instantly warp in a high DPS unit to finish off an enemy that leaks by, but also a safe place to retreat to when he gets hurt.
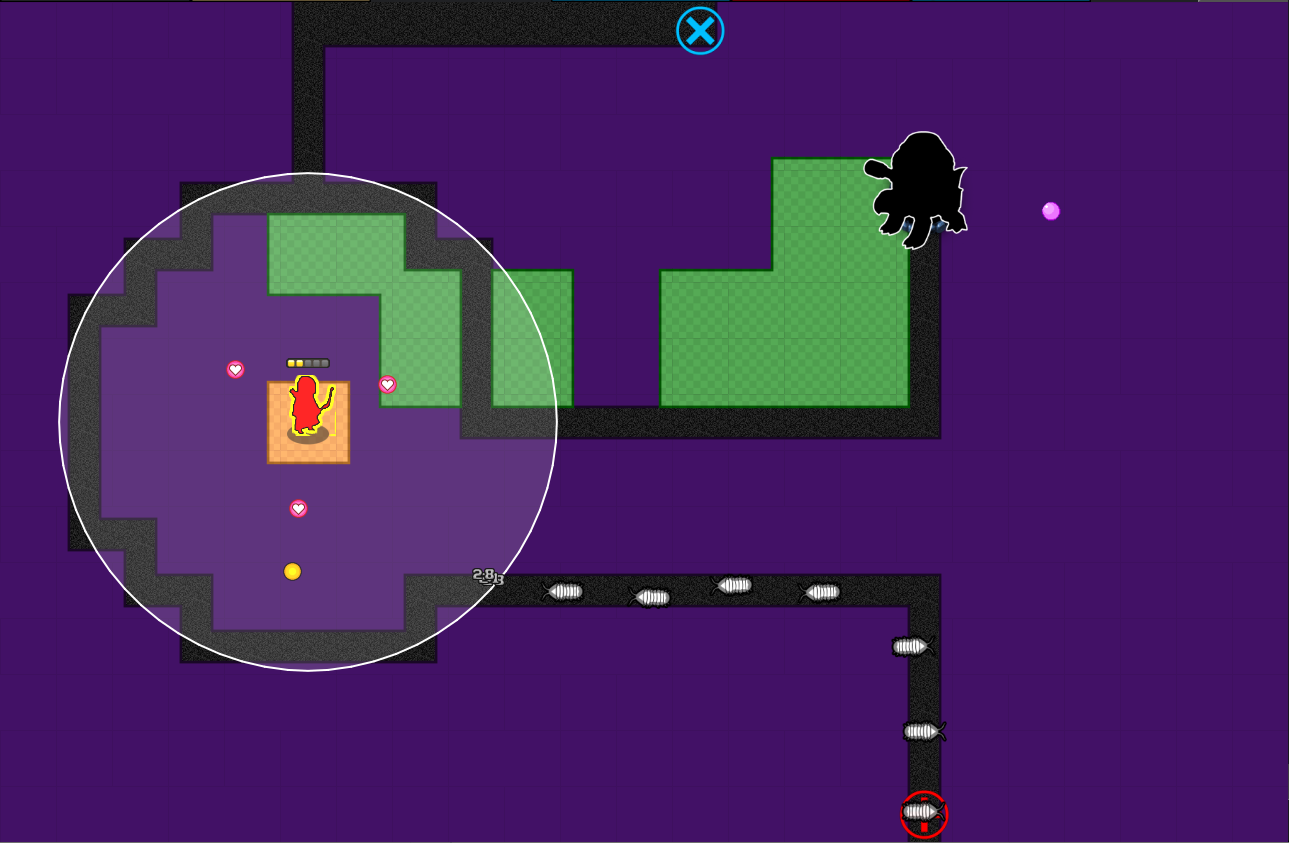
So now these two characters, instead of being kind of a weird muddle where it's not clear where and how you're supposed to use each one, actively feed into each other – Assassin debilitates enemies towards the start of the path, then Jumper attacks them towards the middle and also guards the end. Working from there, the Assassin's intro level starts to feel much tighter:
Assassin goes towards the front, the obvious gold spot is a not-so-subtle nudge on top of that, and the tutorial straight up spells it out. Then I create an obvious middle and end spot which are natural places for Jumper. Honestly this level doesn't really care how optimally you play Jumper, so long as you understand Assassin sufficiently.
Another advantage of removing Assassin's dual purpose is that I can lean all the way in on their identity of inflicting negative status effects. Much like the ice mage in DQ1, I turn on the "optimize effects" targeting button by default for Assassin. This means this unit will make sure to spread out his hits across an entire group of enemies so that they all get a little poison, rather than just whacking the first dude over and over again. With the old Eliminator whose purpose was split between goal-tending and de-buffing, you couldn't make assumptions like this. The player can always override this behavior and play this character in another way, but defaults matter and so it's important to get them right.
Next, we needed to fix the "Collector."
Beating "Level Designer's Block" with Collector
I just got finished redesigning this intro level, and while it's fresh in my mind I'd like to use it as a case study for "level designer's block."
Similar to "writer's block," level designer's block comes from not knowing what I'm "trying to say" with the level. That's typically a sign that I don't know what the purpose of the level is in relation to the rest of the game.
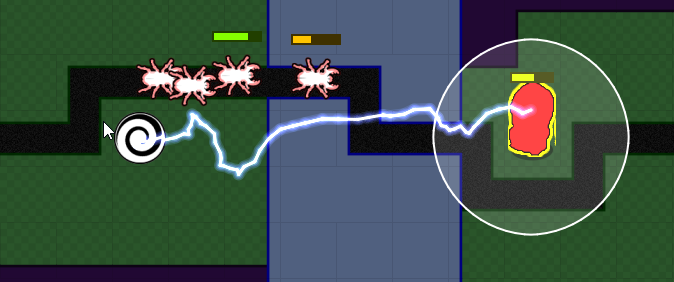
So what is the purpose? Introduce the Collector. As a refresher, Collector is a ranged unit that "stores up" projectiles, not unlike the ghost towers in the "Cursed Treasure" series – each attack launches an autonomous projectile that orbits the Collector until a target comes in range, at which point it fires itself.
Collector has two kinds of projectiles they can "store up" – attack units, and heal units. The heal units can also buff defenders with "inspire," which increases their damage.
So what am I trying to say with this level?
- Here is Collector and how to use them.
- Collector is good at covering multiple lanes.
- Collector is good at holding the middle of a lane.
- Collector is good at helping friends.
Now that I know all of that, this level practically designs itself. But it took me a while to realize that this is what I was trying to say. Playtesting and conversations with my co-designer James (also the game's writer) is what really brought this out.
The first problem is Collector's attacks were too weak and redeployed too quickly. There's no point to storing up attacks if you can fire them off as quickly as enemies can come at you – that's just sounds like a regular projectile tower with extra steps. So I tripled the damage and tripled the cooldown, which did the ticket. Now Collector has big heavy attacks that are worth storing up if you have the time to wait, and if you stick them in a busy lane with a constant flow of targets they won't have enough time to collect extra attacks.
After that, I realized the enemies in the level were not showcasing the Collector's natural talents. So, what's a great big slow-charging ball of damage good for? Anti-armor.
Armored enemies take a damage tax right off the top of any incoming hit. So units that deal lots of quick low-damage strikes (like Jumper, who has the best overall DPS) are at a big disadvantage. But a big fat ball of damage that only loses like 5% to the armor tax? That's ideal.
So by beefing up the attack and slowing down the cooldown, I kept the Collector's DPS consistent (at least assuming constant available targets), but greatly changed their IDENTITY. The amount of damage they can store up now is much more significant, which makes it worth pushing them back a little further on the path so they have time to collect. Now they're a pretty good anti-armor unit, even without any specific anti-armor debuffs.
So naturally, I should spawn a few lanes of armored dudes.
The next issue is I have these other two previously introduced units. The third and fourth intro levels in a sequence are always tricky because the player has more options to cheese things through, and if you haven't done a good job firmly establishing all your character identities this is where it comes back to bite you. In any case, Jumper becomes both a front line attacker and the goaltender, hopping back and forth. And Assassin wants to go early in the fight too to get all their debuffs in.
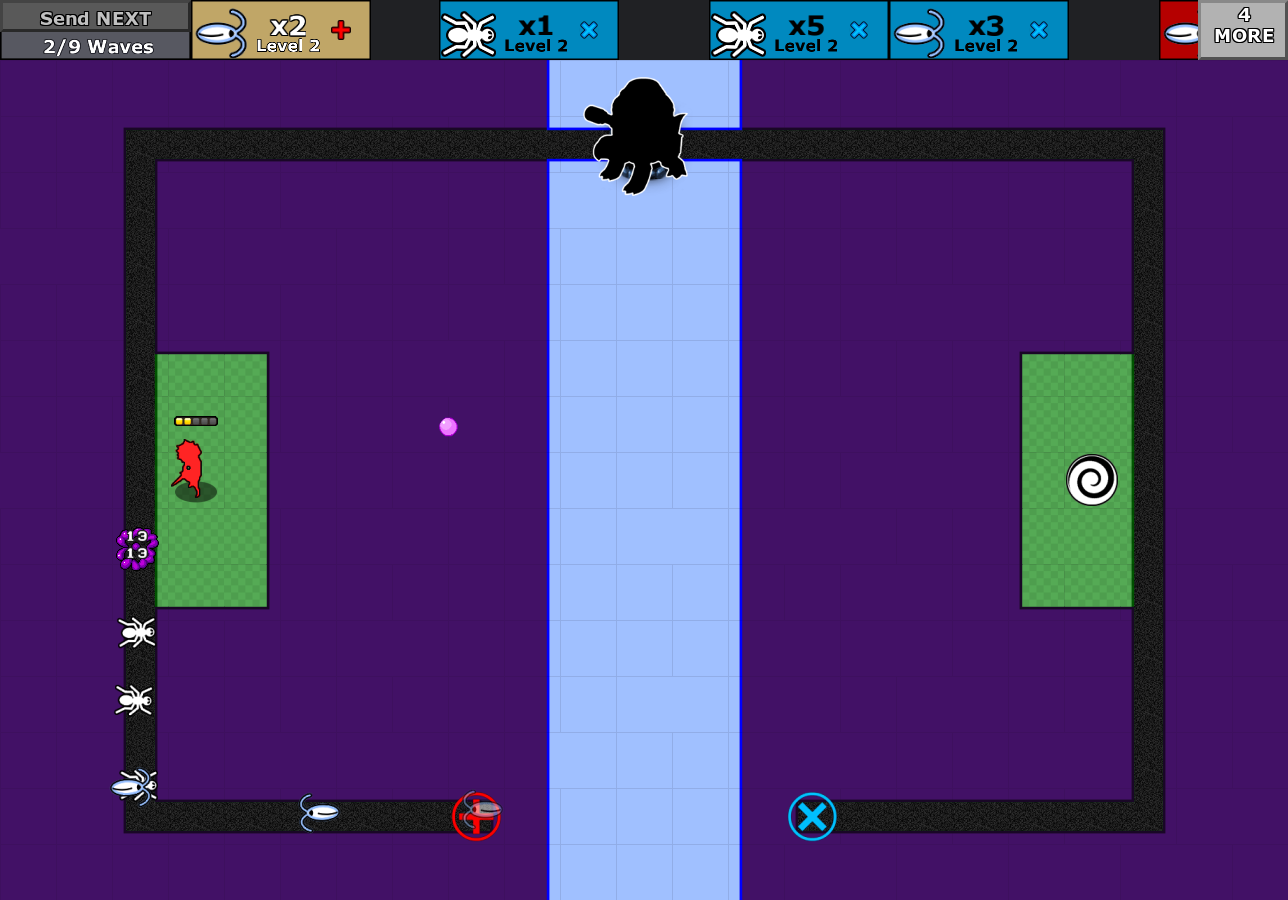
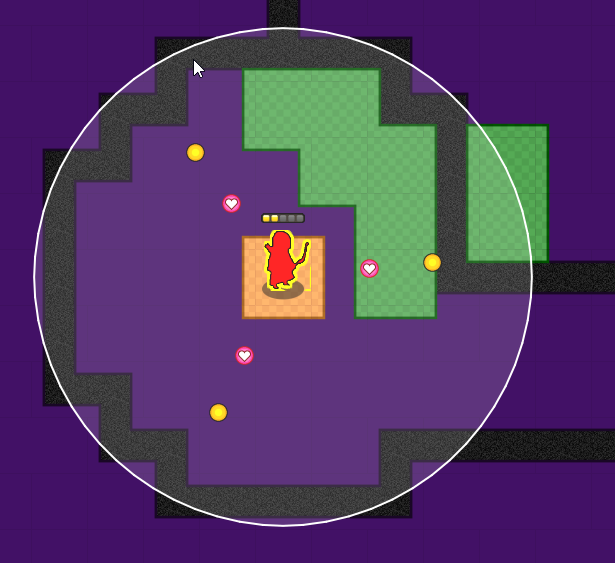
That leaves the middle pretty wide open. The level's big central ring with the prominent gold spot is the obvious choice:

A tricky thing I've been trying to nail at the same time is to make the player realize "Hey! I've already learned to get my Jumper to jump away from danger when they're hurt. And the Collector has healing units. Maybe I should put one of my jump zones in range of the Collector so I can jump away when I'm hurt and get healed!"
I can directly tutorialize that, but it will get really clunky. Whether or not I go that route, the level needs to be designed in such a way that it tends to occur naturally.
But in the back of my head I'm always asking, "am I overthinking this, am I trying to do too much." Is there a way to make this all occur naturally in one level, or do I need to split this one up?
So let's walk through the level and see what story it seems to be telling.
From the pic above, the first thing we do is put the Collector in the obvious spot. The tutorial tells us how the unit works, explains the refresh units at boost two, etc. Playtests suggest I can take for granted that players are now reliably in the habit of boosting freshly introduced units to boost level 2.
You'll notice below that the little armored dudes (pillbug placeholder) are starting to appear. They have lots of health and some armor and it takes a lot for a standard unit to kill them. Collector takes the first one out clean with just two shots.
That's pretty satisfying. These guys are slow, and I intentionally space them out on this wave (spawn rate = 0.2) so that Collector is able to charge back up before the next one comes into range. Collector thus takes out an entire row of big tough slow guys all alone. Feels pretty good.
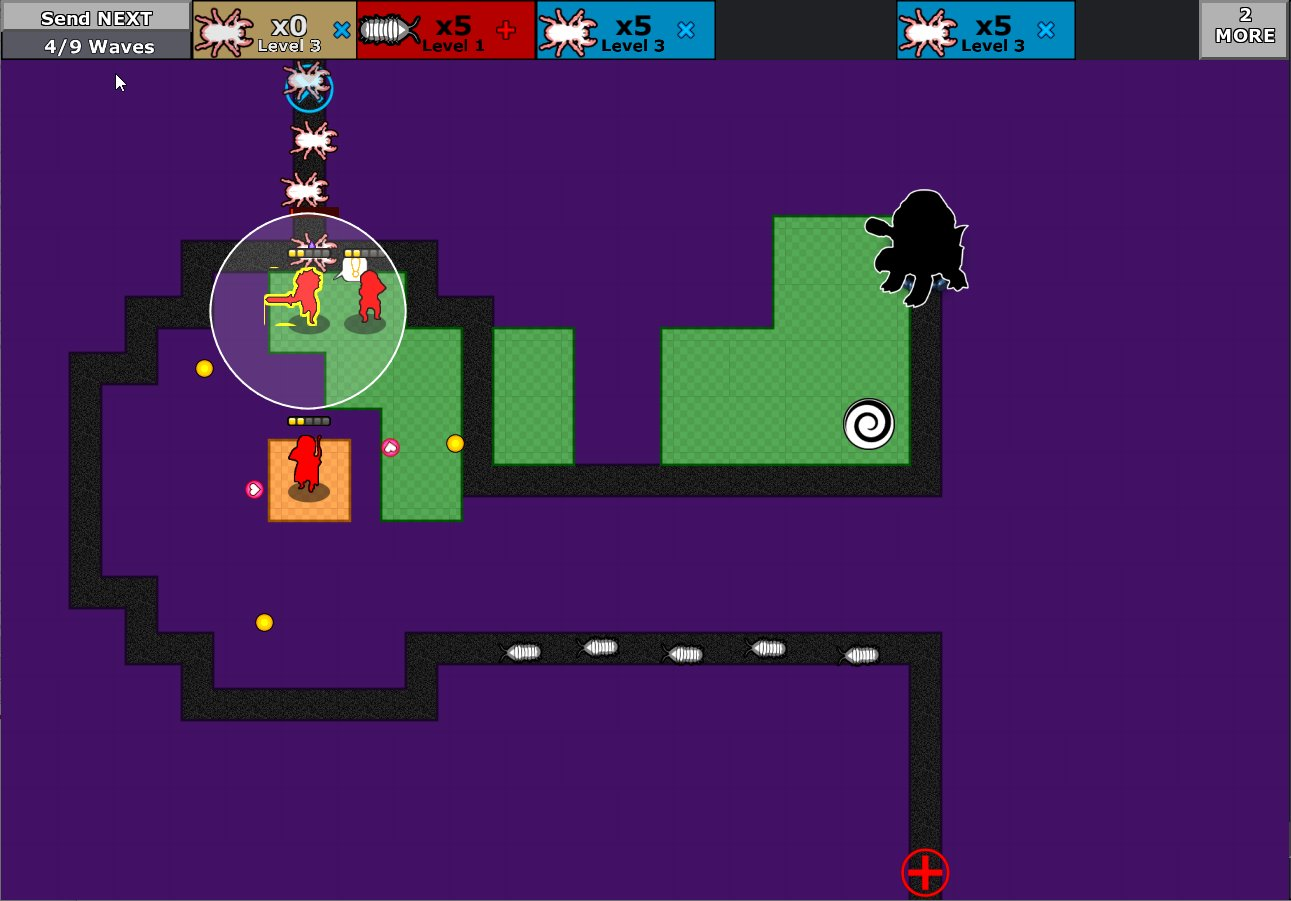
Oh noes! What's this? I'm being invaded by ATTACKER types from the North blue spawn point. Better deal with that. I instinctively reach for my melee units.

I place Jumper and Assassin on the front lines, right next to each other. I place Jumper's jump zone off to the right at the end for goaltending/retreating, as previously taught.
Now this is where I surprised myself. I had initially expected I needed to engineer this level in some complicated wasy such that the Jumper would have to retreat to a zone the Collector was covering in order to get healed, but now I think I don't actually need that.
Not only is it a really flimsy setup to count on the player stumbling into, just placing the Jumper on the front line makes it pretty easy to observe the Collector sending healing units to them each time they get hurt (though the feedback might need to be punched up so that it doesn't get lost in the noise).
I also notice that the units are getting inspired (I did put a new notification on that). That might be all we need!
You place the Collector, learn how they save up attacks when they're idle, and see them use it to good effect against armored enemies. Then you bring in your melee units, and you see the Collector helping them out with healing and buffing. Seems pretty good to me.
Now, this is how I play the level, and I of course designed the dang thing, so it only reflects my intentions of what I want the player to experience. The next step is to drag some fresh playtesters onto this to make sure they get it too.
As for the last Black Hat unit, Ultimate, their intro level seems pretty solid as-is so it hasn't changed much. By tightening up the other three, the team's identity starts to become clear:
- Jumper – Flexible. Glass cannon. High DPS. Front lines and Goal-tending.
- Assassin – Debuffer and debilitator. Front lines, tough enough to not die fast.
- Collector – Shooter and support. Saves up for big hits. Helps your friends.
- Ultimate – Carries an entire lane alone. Big and expensive and totally worth it.
Establishing all of these identities as clearly as possible before we commit to a bunch of art means that when we get down to art time we can make sure that every aspect of the character, from their silhouette to their costume to their animation, embodies their in-game purpose as loudly and clearly as possible.
Thinking along those lines, it seems like Assassin's survivability on the front lines might make more sense if it was implemented as a really high dodge rate paired with a good regeneration stat, rather than from high armor or tons of hit points.
Other Stuff
We did some other stuff this month too.
You might have noticed we experimented with color coding the wave blocks to match the color of the spawn sigil.
We also made a bunch of changes to shops to make the item pacing feel a whole lot better – before we were either overloading the player with items or not giving them enough. Playtests diagnosed the problem as not having enough "towns," so now we've added some more pacing beats so you get a new character, you go to a town and get some equipment for them, and you immediately get to go try it out. Getting the intro levels and the character identities down has also made it easier to get the shop and item identities down too, so the shops now introduce equipment right about the time you start actually needing it. I've also tried to make sure that when we introduce fun stuff like Cannons, everything on offer is actually pretty fun to use and there aren't any lame options. I'm also trying to work on the money curve so that every time you hit a town you can buy at least one thing and have at least one aspirational purchase to long for.
Still a bit rough but I feel like it's getting there.
More stuff next month. Thanks for sticking with us all this time.